A matryoshka doll is a set of dolls of decreasing sizes placed one inside the other. Matryoshkas date from 1890, and are said to have been inspired by souvenir dolls from Japan. The concept of nested objects was familiar in Russia at that time, having been applied to carved wooden apples and Easter eggs.
A set of matryoshkas consists of a wooden figure which can be pulled apart to reveal another figure of the same sort inside. It has, in turn, another figure inside, and so on. The number of nested figures is usually five or more. The shape is mostly cylindrical, rounded at the top for the head and tapered towards the bottom, but little else; the dolls have no hands (except those that are painted). Traditionally the outer layer is a woman dressed in a sarafan. Inside, it contains other figures that may be of both genders, usually ending in a baby that does not open. The artistry is in the painting of each doll, which can be extremely elaborate. From Wikipedia, the free encyclopedia
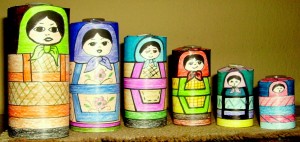
Our matryoshka doll, a set of six dolls, is made of cardstock and colored with colored pencils or colored markers.
Supplies:
- White cardstock
- Matryoshka dolls 1&6 (Pattern)
- Matryoshka dolls 2&4 (Pattern)
- Matryoshka dolls 3&5 (Pattern)
- Colored pencils or colored markers
- Scissors
- Tacky glue
- Glue gun and glue stick
- Six large buttons
Directions:
- Print the matryoshka doll patterns on white cardstock.
- Using colored pencils or colored markers, color the dolls. Add designs on the costumes and headscarves.
- Cut on the solid lines. Run glue on the area to the right of the dotted line, roll the opposite side over the glued area having the edge butt up against the dotted line. (It is important to butt the edge right up to the dotted line so the dolls will nest.) Press and hold until the glue holds.
- Cut slits on the top of the doll’s head through the solid lines down to the dotted line. Fold all the tabs made to the center, starting at the back and working around to the front of the doll. If the tabs are inside the roll, take a ruler and push them toward the top until they lay flat on the top on the doll head. Apply glue to a large button and affix it over the tabs. This works better with a glue gun, but the tacky glue will work.
- Finish all the dolls in the same manner as above. The dolls will fit inside each other.
4th Grade Projects Gallery:

